RolandDeschain79
Android Adventurer
How to Play Fallout 1, 2 and Tactics on Android!
[video=youtube_share;Co78pPKakkI]https://youtu.be/Co78pPKakkI[/video]
[Guide+Video]How to Play Classic PC Games on Android with Exagear RPG/Strategies(XDA)
Additional resources:
-ExaGear RPG main page
-ExaGear Strategies main page
-Exagear RPG/Strategies Playable game list Here
-Join the ExaGear RPG Beta Testing community Here
-Join the ExaGear Strategies Beta Testing community Here
-Follow the Google+ pinned post for Beta testing community
[Guide+Video] How to Play PC Games on Android with DosBox Turbo
Note: If your device is unable to run ExaGear try Dosbox Turbo, it will run similar games.
What is ExaGear?
ExaGear is a complex emulation engine app that allows you to play many classic PC games on your Android device. It features one the most powerful emulated systems on Android and is relatively easy to setup. Official games have controller sets specially adapted for gaming on your mobile device. In addition many unofficially supported games are playable with the help of customs controllers and apps. The following guide will explain how to setup and play Games with ExaGear.
Emulated PC Gaming System
CPU: 1Ghz Pentium 3 (Core # Varies)
GPU: 130MB Wine DirectDraw
HDD: Emulated to the size of your devices internal storage.
RAM: Emulated to the size of your devices RAM

-ExaGear system DxDiag on my Note 2
Games are Not included! (Some Assembly Required)
How to Play Classic PC Games on Android with Exagear RPG/Strategies
1)Install the ExaGear RPG or ExaGear Strategies app on your Android device. Open the app from the device for the first time to unpack data and create the default Exagear folders in the internal storage. A basic set of instructions will be shown prompting you to transfer game data to the device. No Games are included with the app. ExaGear is offered as a free trial for 3days after a game is first started. Once the trial expires you can purchase a controller set or use short 10 minute gameplay sessions.

2)A)Select an Officially supported game from the "Officially supported Games and controller types:" list below and view the recommended controls for that game.
Or
2)B)Select an Unofficially supported game from the Launched game list here and select a game that might be playable but could require additional modifications and controller setup covered in the, "How to setup Unofficially supported Games and Controls:" guide below.
Freshly install the selected game on your PC with the latest patches, I recommend GOG DRM free games but older CD/DVD versions work fine but may need NOCD games fixes. After fully installing and patching your games ,locate the install folder(s).
Officially supported Games and controller types:
ExaGear RPG
Current controls are customized and adapted for:
• Arcanum (Argentum controls are recommended)

• Fallout 1, 2, (Ferrum controls are recommended)

• Jagged Alliance 2 (Alluminium controls are recommendedl)

• Might and Magic VI, VII, VIII (Magnesium controls are recommended)

ExaGear Strategies
Current controls are customized and adapted for:
• Disciples 2 (Helium controls are recommended)
• Heroes of Might and Magic 3 (Helium controls are recommended)
• Panzer General 2 (Helium controls are recommended)

• Civilization 3 (Cuprum controls are recommended)

3) Plug your android device into the PC with the USB cable and locate the "ExaGear" folder you created when running the app for the first time. The ExaGear RPG and ExaGear Strategies apps share the same "ExaGear" folder located in the root directory of your internal storage(Default location). If you wish to use an external SDcard for storage, create an "ExaGear" folder on the SDcard. Place your games folders into the "ExaGear" app folder in either location and your games be will automatically detected by the app. Please stand by while the game data transfers to your android device, this may take sometime....Wait for it. Once complete you may disconnect the USB cable. Alternately you could download the game data directly to the device and place it into an ExaGear folder with afile explorer program.


Possible DVD\CD\GOG Default game data locations:
C:\Program Files (x86)\ (Game or Company Name)
C:\Program Files (x86)\GOG Games\ (Game or Company Name)
C:\Program Files\ (Game or Company Name)
C:\GOG Games\ (Game Name)
C:\Sierra\ (Game Name)
4)Locate and start the Exagear RPG/Strategies app from your android device. Click "Show unsupported executables.." to show .exe files for games not officially supported. You will need to Select the .exe and controller type for the game you wish to launch, select trial or buy the controller set to launch it. You can edit the exe's default run config by selecting the three dots. Here you can change the default Resolution, Color Depth and Controller type. Once you've selected your defaults the game will load, please stand by..

How to setup Unofficially supported Games and Controls:
Review the Exagear RPG/Strategies list of Launched games here and choose a game you wish to play. The column titles are in Russian and contain useful information for setting up your games. See the picture below for reference and translation.
Spreadsheet translation columns:
-C= Version, D= The Game, E= Suggested exe rename, F= Resolution, G= Color Depth, H= Language Encoding, I= Comments/Notes

-Refer to column E, you may need to rename the unsupported game exe(s) to one that is supported.
-Locate the game data folder, make a copy of the exe file and rename it.
-Changing unsupported exe names can enable the game to be launched with ExaGear.
-Refer to column I, you will need to Download a dsound.dll here and place it into your game folder. Sound.dll Archive here.
-Refer to column F & G, you can change default Resolution and Color Depth from the run config menu. From app main click the 3dots by the exe name and set default values for games.
How to Add custom controls
-Many games are playable but not yet officially supported by ExaGear.
-Setting up custom onscreen controls or using Bluetooth/OTG devices can help make games playable on your device.
-I recommend adding custom onscreen controls with the paid GameKeyboard + app Here:
-Follow the apps setup instructions
-Customize the onscreen controls
-Reduce the transparency to better see the game with the onscreen overlay.
-Enable Non-Blocking mode so that the onscreen controls won't block ExaGears touchscreen input.
-GameKeyboard + Screenshot with Arcanum Setup.

How to Patch and Play Games with ExaGear RPG/Strategies:
How to use Fallout Mods with ExaGear RPG
-I recommend using the GOG versions of fallout 1 and 2 but the CD and DVD versions should work fine. I don't believe the steam versions work.
-Locate your Fallout 1 or 2 game data folder in order to begin patching it. Get your copy of Fallout 1 or 2 setup with the latest patches and win9x compatibility by following the below instructions.
Note:The below setup instructions for Fallout 2 and the Restoration Project will get the game working on Android but may cause it not to run properly on your PC. To reverse this just go back to step 3 in the following setup instructions and overwrite the "Windows 95-98-ME" files with the newer "Windows XP-VISTA-7" files from Killaps Fallout 2 manual patch folder.
Note: Patching your game or installing the restoration project will require you to start a new game of Fallout.
Fallout 1/Fixt Mod
Download Fallout Fixt patch Alpha 6.7.2 FIXES ONLY from the main page here.
Note: Launch Fallout Fixt from the FALLOUTW.exe file.
Note: The Alpha 6.7.2 FULL CUSTOM install version of the patch caused some issues stick with the fixes only patch for ExaGear RPG.
-Goal of Fallout Fixt: "To enhance, fix and improve the Fallout 1 experience. This includes fixing bugs, restoring features, modifying balance, adding features, and many fixes to text/dialog. In addition to that, all other available mods and patches are rolled into Fixt, meaning that Fallout Fixt is the only thing needed for "the best" Fallout 1 experience. As of the most recent version, this mod fixes roughly 150 bugs still present in the unofficial patches, and adds roughly 170 features. In addition, there are hundreds if not thousands of text&dialog fixes."
(Optional)Download and extract my custom Fallout cfg files here then copying and paste it into your Fallout directory. These config files correct the game path for the sound data files. If you have issues with the game launching and crashing try this.
Fallout 2
-If you wish to play Fallout 2 I recommend installing Killap’s unofficial fallout 2 patch.
1) Download and Extract the Unofficial patch, open the folder.
2) Open the extracted patch folder, copy the "data" folder and paste it into your Fallout 2 install directory. (yes to overwrite the files)
3) Open the "Windows 95-98-ME" folder and copy and paste these files into your Fallout 2 install directory. (yes to overwrite the files)
4) Open the “Batch_work’ folder and copy and paste these files into your Fallout 2 install directory. Run the "master_dat_fix_up.exe" file (A window will popup, wait for it..)
5) Next this is EXTREMELY important, in your Fallout 2 install directory delete a file called "patch000.dat"
6) Download and extract my custom Fallout cfg files here then copying and paste it into your Fallout directory. These config files correct the game path for the sound data files.
Fallout 2 Restoration Project Install Guide:
-If you wish to play Killaps Fallout 2 Restoration Project with Exagear RPG then do the following.
1) Download and Extract the manual Restoration patch(latest version Here), open the folder.
2) Open the "main" folder and copy and paste these files into your Fallout 2 install directory. (yes to overwrite the files)
3) Open the "Windows 95-98-ME" folder and copy and paste these files into your Fallout 2 install directory. (yes to overwrite the files)
4) Open the “Batch_work’ folder and copy and paste these files into your Fallout 2 install directory. Run the "f2.bat" file (A window will popup, wait for it..)
5) Next this is EXTREMELY important, in your Fallout 2 install directory delete a file called "patch000.dat"
6) Download and extract Mash’s older resolution patch Fallout2 Hi-Res Patch v3.06 here: Paste the contents of the folder into your fallout 2 folder and replace the files.
7) Download and extract my custom Fallout cfg files here then copying and paste it into your Fallout directory. These config files correct the game path for the sound data files.
Fallout Tactics
-Show the hidden BOS game exe, it launches normally.
-Use the ‘Ferrum’ controls.
-Set the game to run at 800x600 16bbps before running the exe. from the main menu.

Enjoy wandering the Restored wasteland with Exagear RPG.
Arcanum
Set the game to run at 800x600 16bbps before running the exe. from the main menu.

-Unofficial Arcanum Patch v091225 worked with android
-Index of Arcanum Mods and Patches here
Diablo 2(LOD)
-Rename the Diablo 2 exe to fallout2.exe (Optional)
-You will need to place one of these additional sound files for Exagear RPG/Strategies
- Download and place this sound.dll file into your Diablo 2 game folder.
Troubleshooting:
-If you experience issues loading saved games try creating a new game and make sure your data is in the internal storage. Android 4.4..x Kitkat introduced a number of read write restrictions for apps files not located in the downloads folder. The app developer is working to sort out such issues but fixes could take time. Contact the developer here if you have purchased the app but can't play a game properly on your device @ support@eltechs.com or from the links on Play store page here.
-Support for image files is still being worked on.
Hello Android gamers today we will be learning how to play PC games on Android with the App DosBox Turbo, the best and fastest Dos Emulator for Android. Recent developments have brought improved Win9x emulation to DosBox Turbo, such as Voodoo 1support. I have been working with the excellent developer Fishstix to bring my Fallout for Android Win9x solution to DosBox Turbo. After much beta testing we present you with our win 9X solution for gaming on Android. Your emulated Vault 13 computer can run many old school classics, including the first 3 fallout games.
Fallout the game is Not included! (Some Assembly Required)
XDA Thread DosBox Turbo Version:
XDA Thread QEMU Version:
DosBox Turbo Version Videos:
[video=youtube_share;f21K1Exq2jA]http://youtu.be/f21K1Exq2jA[/video]
[video=youtube_share;aAsFVUL0b_w]http://youtu.be/aAsFVUL0b_w[/video]
[video=youtube_share;HQUqMC5G5Ak]http://youtu.be/HQUqMC5G5Ak[/video]
Fallout installation guide for DosBox Turbo (Paid App)
Emulated Android PC Performance
Recommended System Requirements:
CPU Quad- Core, Dual-core 1.2Ghz+, equivalent or better.
GPU Adreno 220+, Nvidia Tegra2/3/4, equivalent or better.
2GB, 1GB, 512MB. My Config asks for a min or 256MB & shouldn't be run on a device with less than 512MB.
8GB disk space
Minimum System Requirements:
1Ghz Single-Core CPU with 512MB of Ram
GPU Adreno 220
4GB Disk Space
Android to PC hardware conversion:
Quad Core Samsung Exynos (1.6 Ghz - Samsung Galaxy Note II) ~ Pentium 75 - 90
Quad Core Nvidia Tegra3 CPU (1.5Ghz) ~ Pentium 60-75Mhz
Dual Core Nvidia Tegra2 CPU (1Ghz) ~ 486@66-80Mhz
Dual Core A9/Exynos Processor (Samsung Galaxy II @ 1.2Ghz) ~ 486@75-90Mhz
Dual Core Qualcomm Snapdragon S3 (MSM8260 1.5Ghz) ~ 486@50Mhz
Single Core Generic Cortex A8 (1Ghz) ~ 486@33-40Mhz
Note: Emulated Graphics = 3Dfx Voodoo 1 4MB (3D) and S3 Trio64V+ 4MB (2D)
DosBox Turbo main information page
DosBox Turbo Performance Page
DosBox Turbo Win9x Installation guide:
1)a]You will need to have the DosBox Turbo app installed on your Android device. Run the DosBox Turbo app and open the settings menu from either the pull down menu at the Top or left side swiping menu. Go to “DosBox Settings/Advanced DosBox Config” check “3DFX Glide Support” and “Manual Mode”. You must restart the app before these changes will take effect.
DosBox Turbo Play Store Link:
b]Attention Dosbox Turbo Users there have been some recent changes to the default directory paths. Due to these changes you will now need to change the directory path back to the old default or place the dosbox config into the new location in step 7. You can change the default location now by selecting “Config location” right under where you selected manual mode. You will see a directory path similar to the one below. Note the beginning of the path can vary depending on the type of device used.
Default manual mode config file directory path:
/<path to sdcard>/android/data/com.fishstix.dosbox/files/dosbox.conf
On my Note 2:
/storage/emulated/0/android/data/com.fishstix.dosbox/files/dosbox.conf
Remove the part from between the dosbox.conf and the root directory of your internal memory(Aka the primary external SDcard):
Before:
/<path to sdcard>/android/data/com.fishstix.dosbox/files/dosbox.conf
After:
/<path to sdcard>/dosbox.conf
On my Note 2:
Before:
/storage/emulated/0/android/data/com.fishstix.dosbox/files/dosbox.conf
After:
/storage/emulated/0/dosbox.conf
New Default paths for dosbox turbo files and folders:
Default manual mode config file:
/<path to sdcard>/Android/data/com.fishstix.dosbox/files/dosbox.conf
Default location for the manager app launcher config:
/<path to sdcard>/Android/data/com.fishstix.dosboxlauncher/files/dosbox/<game name>.conf
Default dos game space that is mounted as C:
/<path to sdcard>/Download/
-Click to see the pic.

DosBox Turbo Win9x Gaming Package Downloads:
2)a] Version 1.0 is the most stable but lacks Win9x CD/ISO support. Use this version to Play games that don’t require the use of CD’s i.e. mounted ISO images.
Or
2)b] Version 2.0 is less stable due to the Win9x CD/ISO support. Use this version to Play games that require the use of CD’s i.e. mounted ISO images.
Notes:
-The CD Rom support makes emulation less stable and can cause error messages when starting win9x with DosBox Turbo.
- If you experience errors simply exit and restart the app.
-To use ISO files they must be located within a folder before transferring them to the HDD.img.
-If the ISO is not located in a folder it will attempt to fill the HDD image and won't work correctly.
-There are alternatives to installing game data from the ISO.
-You can use the WinImage program to extract the ISO’s contents to a folder.
-This can be added to an HDD image and the setup exe run from inside of an emulated win9x environment.
-Many classic games can be run with a Game Fixes, that will allow you to play without the CD.
GameBurnWorld No-CD Game Fixes
Or
2)c] Version 3.0 runs slightly faster since its based on win95 but only has DX8.0 support and therefore doesn't run as many games as V1.0. Use this version to play games on a slower device that don't require DX9C support.
3) Install the free 30 day trial of WinImage and run the application. Be sure to use it before 30 days passes. This program will allow you to open and save your game data to your empty hdd .img files.
WinImage 9.00 Download:
4) Open your downloaded package and look for the hdd folder. Inside you will find the empty hdd images files to store your games and ISO’s. Extract the default hdd-2gb image file and open the folder.
(Optional) If you wish to change the size of the image file you are using, then you must also change the name and drive geometry in the dosbox.conf file.
Default hdd line in the dosbox.conf file:
imgmount d: /sdcard/hdd-2gb.img -t hdd -fs fat -size 512,63,64,1023
Change the hdd name and drive geometry in the dosbox.conf file:
imgmount d: /sdcard/hdd-1gb.img -t hdd -fs fat -size 512,63,64,520
Driver Geometry:
2GB image: 512,63,64,1023
1GB image: 512,63,64,520
512MB image: 512,63,32,520
256MB image: 512,63,16,520
(Optional) If you wish to store the hdd onto an SDcard instead of the devices internal memory, then open the dosbox.conf file and change the following.
Default hdd line in the dosbox.conf file:
imgmount d: /sdcard/hdd-2gb.img -t hdd -fs fat -size 512,63,64,1023
Change the SDcard path to the HDD image:
imgmount d: /mnt/sdcard1/hdd-2gb.img -t hdd -fs fat -size 512,63,64,1023
or
imgmount d: /mnt/extsdcard/hdd-2gb.img -t hdd -fs fat -size 512,63,64,1023
or
imgmount d: /storage/extSdCard/hdd-2gb.img -t hdd -fs fat -size 512,63,64,1023
5) Now that WinImage is installed you can open the empty hdd.img’s by double clicking them, dragging them into the open WinImage program, Or find them from the WinImage menu file/open.
6) Locate your fully installed games such as DRM free GOG games, ISO images or extracted game data. Drag the folder(s) containing this data into the opened hdd image files. Save your new hdd.img and close the program.
7) Plug your Android device into your PC with the USB cable and open your devices internal memory. This is the area that opens by default from your computer with the USB cable, all your android data is located here. Transfer the hdd.img, c.img, and dosbox.conf, files into this space; note that none of these files should be located in a folder.
8) Once the data is on your android device you can disconnect the USB cable. Now you can start the DosBox Turbo app and play your retro PC games on android, have fun.
9)(Optional)Get the free Hackers Keyboard from the Play Store. It has a better layout for playing games and includes directional keys.
How to use Version 2.0 with CD/ISO support:
1)Start the Daemon tools program by click the desktop icon.
2)Tap the Icon that will appear in the bottom right corner.
-Select “Device 0: [E:] No media”
3)Find your ISO image and select it
-Auto play should now start your CD.
Note:To use ISO files they must be located within a folder before transferring them to the HDD.img.
-If the ISO is not located in a folder it will attempt to fill the HDD image and won't work correctly.

Use this to Play Games like, Star Wars Jedi Knight: Dark Forces II.This video demonstrates how to mount the ISO images using Daemon tools@1:28..
[video=youtube_share;jet3hYxpQdc]http://youtu.be/jet3hYxpQdc[/video]
How to setup Fallout 2/Restoration Project and Fallout Tactics:
Fallout 1 Dos Guide + Video
Fallout 1 is best played without win9x since Dosbox turbo is a Dos Emulator.
Click here for the How to Play Fallout 1 with Dos guide
Fallout 2 Regular
-If you wish to play Fallout 2 I recommend installing Killap’s unofficial fallout 2 patch.
1) Download and Extract the Unofficial patch, open the folder.
2) Open the extracted patch folder, copy the "data" folder and paste it into your Fallout 2 install directory. (yes to overwrite the files)
3) Open the "Windows 95-98-ME" folder and copy and paste these files into your Fallout 2 install directory. (yes to overwrite the files)
4) Open the “Batch_work’ folder and copy and paste these files into your Fallout 2 install directory. Run the "master_dat_fix_up.exe" file (A window will popup)
5) Next this is EXTREMELY important, in your Fallout 2 install directory delete a file called "patch000.dat"
6) Download and install one of my custom Fallout cfg files by copying and pasting it into your Fallout directory. These config files correct the game path for the sound data files.
a)Config With Video & Ambient sounds: This can improve screen scroll performance with and increased art_cache_size=256. You can also manually open the fallout2.cfg and change the value. I recommend 256, 512, or 768 (default=8).
b)Config without Video & Ambient sounds: This increases performance by removing ambient and video sounds. If you experience crashing when the videos play then, you will need this file. Note*NPC conversations will still have spoken dialogue.
Note: Fallout 2 should be played at the default resolution of 640x480, with a 8bit color depth in basic graphics mode for best results. Using higher resolutions with 16-32bit colors or using DirectX9/Direct draw 7 graphics modes can cause the game to become unplayable.
7) (Optional) You can also install Mash’s resolution patch: to increase your screen size.
Note This may impact game performance but allows you to see much more of the map at once.
Download Fallout2 Hi-Res Patch v3.06
Fallout 2 Restoration Project
Note(Important) The Fallout 2 Restoration Project requires a faster device to run than a regular install of Fallout2. A Quad core device with 2GB+ is required
-If you wish to play Killaps Fallout 2 Restoration Project on Android then you must do the following.
1) Download and Extract the manual Restoration patch, open the folder.
2) Open the "data" folder and copy and paste these files into your Fallout 2 install directory. (yes to overwrite the files)
3) Open the "Windows 95-98-ME" folder and copy and paste these files into your Fallout 2 install directory. (yes to overwrite the files)
4) Open the “Batch_work’ folder and copy and paste these files into your Fallout 2 install directory. Run the "f2.bat" file (A window will popup)
5) Next this is EXTREMELY important, in your Fallout 2 install directory delete a file called "patch000.dat"
Fallout 2 Restoration Project Manual Version Download:
6) Download and install one of my custom Fallout cfg files by copying and pasting it into your Fallout directory. These config files correct the game path for the sound data files.
a)Config With Video & Ambient sounds: This can improve screen scroll performance with and increased art_cache_size=256. You can also manually open the fallout2.cfg and change the value. I recommend 256, 512, or 768 (default=8).
b)Config without Video & Ambient sounds: This increases performance by removing ambient and video sounds. If you experience crashing when the videos play then, you will need this file. Note*NPC conversations will still have spoken dialogue.
Note: Fallout 2 should be played at the default resolution of 640x480, with a 8bit color depth in basic graphics mode for best results. Using higher resolutions with 16-32bit colors or using DirectX9/Direct draw 7 graphics modes can cause the game to become unplayable.
Fallout Tactics
-In order to make Fallout Tactics playable on Android you will need to remove ambient sounds from the game.
-You can also remove videos since they don’t currently run properly and just take up extra space.
-How to remove ambient Sounds and Optimize files:
-Use Odin’s Booster app to modify the audio files so ambient sounds can be deleted.
-Run Boost "Browse" to your FT directory. Next select sound_o.bos and sound_amb.bos under "files to optimize".Click on "Optimize!"
-In the Fallout Tactics install Folder:
-Delete the ambient sounds folder from the fallout tactics/core/sounds/ambient
-Delete intro movie from fallout tactics/core/movies/intro.bik
Odin's FT Booster utility,"allows faster, smoother scrolling & much less disk usage":
[video] Fallout Tactics on Android with DosBox Turbo
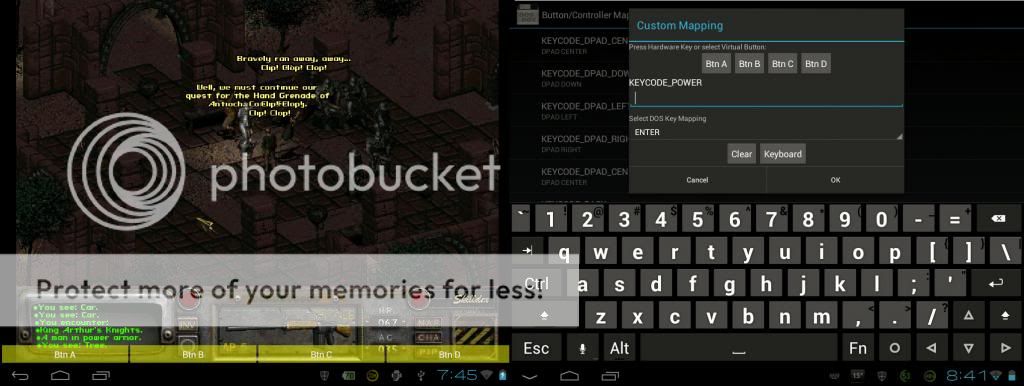
Using Virtual On Screen Buttons:
-In the DosBox settings menu check “Overlay Buttons”.
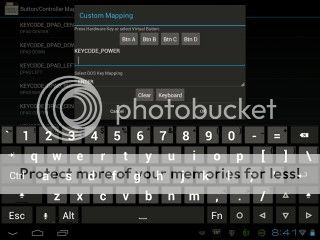
-Open “Button/Controller Maps” and choose “Add button Mapping”.
-A new label will appear, click it “Map custom Button (x)”
-At the top select 1 of 4 custom buttons to map
-Now select “Dos key mapping” and assign a key to the button.
-Once done select ok and repeat this for all 4 buttons.
-A good setup for playing fallout would be:
-Btn A=space, Btn B=b, Btn C=I, Btn D=s
-space=end turn, b=change hands, i=inventory, s=skill index,
-There is a Fast Forward button at the very bottom of the “Dos key mapping” menu, scroll down all the way.
-Map this key and you can hold it down to increase the cycles.
-This helps to speed up long load times, but note it will distort any audio that is playing.
DosBox Turbo Performance Tweaking:
-If your android device has 1GB of memory or more, then you can increase the usable memory from the default of 256MB to 512MB.
-Open the dosbox.conf file and change the value to memsize=512
-Once the value is save the changes and transfer the dosbox.conf file over to your device.
-Increasing the memory can improve stability and performance.
Before:
[dosbox]
memsize=256
machine=svga_s3
After:
[dosbox]
memsize=512
machine=svga_s3
Overclocking:
-You will need to be rooted in order to Overclock your device. Increasing your CPU speed can have a large impact on performance and could make games playable on older devices.
-Get a free overclocking app from the Play Store such as AnTuTu's CPU Master (free). Open the app and increase the speed in small increments of 100-200Mhz and then run AnTuTu's Benchmark to check stability and performance. Once you've found a stable overclock start up Dosbox and have fun.
Extra HDD space for Virtual Memory:
-Using a 1/2GB HDD and then allocating free space for for virtual memory, could help to improve performance.
-Once you're running win9x right click on the vault 13 desktop icon and choose properties, select the performance tab,“virtual memory” at the bottom, click “Let me specify my own virtual memory settings”. Select the HDD and specify the amount of space you want to use for virtual memory.
-It will prompt you to reboot once you exit. Don’t reboot, choose no, and then shutdown and re-launch the emulator.
-This will help to keep System Resources between 98-99% free, this helps to optimize the performance.
-You can check the performance by right clicking on the Vault 13 desktop icon and selecting properties. Navigate to the performance tab at the top and look for “System Resources:98%free”.
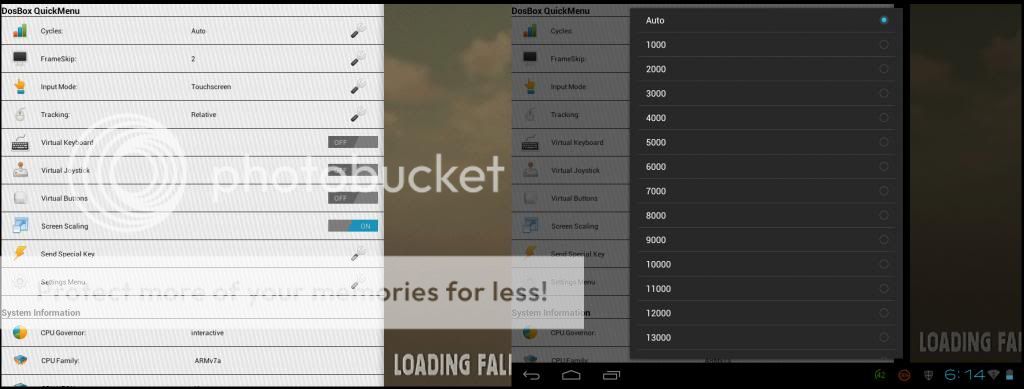
DosBox Turbo Quick Menu:
-You can access the quick menu by swiping the left side of the screen.
- This will give you access to quick settings and toggles for your input devices.
-To improve load times you can select “Cycles” and increase this number.
-By default it will be on Auto, which gives the best balance between sound quality and performance.
-Increasing this will cause the games to load faster but can badly distort the sound.
-You can Toggle this up in games that have long load times.
- Set the Cycles back to Auto once your game has loaded.
-You can also disable the sound in the DosbBox settings and play with increased cycles.
-This will significantly improve performance on slower devices.
How to Benchmark Dosbox Turbo:
Dos Doom Shareware Benchmarking:
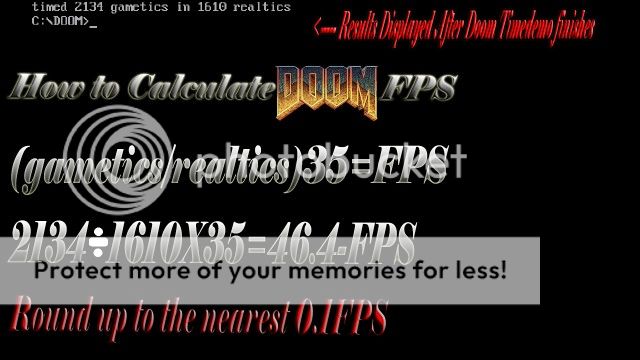
In order to get comparable results for every device, the Doom 1 timedemo 3 is used as the main benchmark for Dosbox turbo. To ensure that the results are accurate all users should use the Doom1 Shareware v1.9 in conjunction with a preset Dosbox config file. The config file will automatically run the test and display the results.
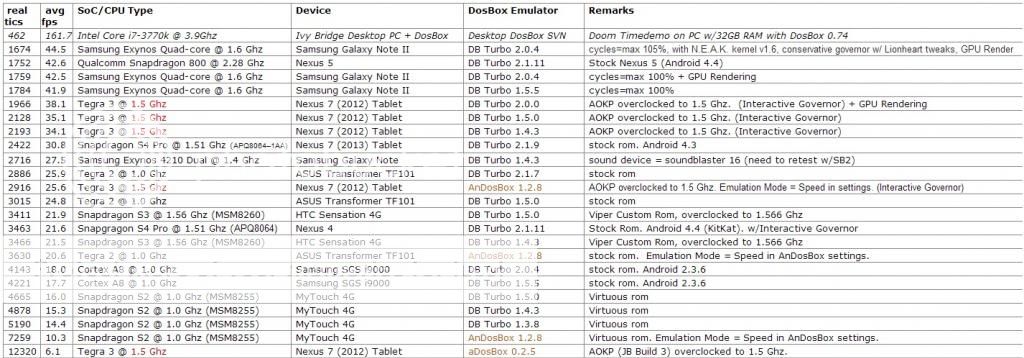
Doom time demo results will be displayed as gameticks and realticks. In order to calculate the average Frames per second (FPS) we will enter these results into this equation 35(gameticks/realticks). The gameticks will always be 2134 for the Doom Shareware V1.9. If you have a different number then you aren’t using this version and results will not be comparable. Compare you results with those on theDosbox Turbo performance page here:
1) You will need to have the DosBox Turbo app installed on your Android device. Run DosBox Turbo and open the settings menu from either the pull down menu at the Top or left side swiping menu. Go to “DosBox Settings/Advanced DosBox Config” check “Manual Mode”. You must restart the app before these changes will take effect.
2) Download the Doom v1.9 shareware and config with Auto exe. Copy this file and folder into your internal storage space. This is the area that opens by default from your computer with the USB cable, all your android data is located here. The folder should be called doom and have all the data contained within. If it doesn't run you can manually run the test by launching Doom, bringing up the console by pressing (`)and typing “timedemo demo 3”.
3) Launch the Dosbox Turbo app from your device and Doom will start and run time demo 3. Once complete you will see your results that you can calculate your average FPS from. Round up your results to the nearest 0.1FPS.
4)Compare you results with the chart on the DosBox Turbo Performance Page
Multiplatform benchmarking with Quake 1 in Win9x and Dos:
Faster devices can use the Quake 1 timedemo in both Dos and win9x. This will allow you compare performance between Dos, win9x and win9x with Glide 3Dfx support. Results will be displayed as an average frames per second (FPS). Dosbox Auto exe configs can be used for Dos benchmarks and automated benchmark shortcuts are used for win9x.
1) You will need to have the DosBox Turbo app installed on your Android device. Run the DosBox Turbo app and open the settings menu from either the pull down menu at the Top or left side swiping menu. Go to “DosBox Settings/Advanced DosBox Config” check “3DFX Glide Support” and “Manual Mode”. You must restart the app before these changes will take effect.
2) Download the Quake shareware demo and config files. Copy the Quake folder into your devices internal storage space. This is the area that opens by default from your computer with the USB cable, all your android data is located here. The folder should be called quake and have all the data contained within.
3) To run the Quake 1 Dos benchmark, copy the Quake Dos config from the folder onto your device. Launch the Dosbox Turbo app from your device and Quake will start and run the time demo via the auto exe. Once complete you will see your results as an average FPS. If it doesn’t start you can manually run the test by launching Quake, bringing up the console by pressing(`) and typing “timedemo demo1”.
4) To run the Quake win9x benchmark copy the Quake win9x config from the folder onto your device. Place the Quake shareware demo folder into your HDD image, save it and transfer it to the device. This is the same procedure covered in the video for playing PC games with Dosbox Turbo. Launch the app to start win9x, open the shortcut to D and find the Quake folder. Inside this folder you will find several benchmark shortcuts for both regular quake and GL quake. Two Quake mods have been added to the folder to enable 3DfX glide support, Pro quake and Joe quake. Run one of these shortcuts to automatically start the benchmark and display results once complete. Note Pro Quake is the recommended benchmark for Quake in win9x. Joe Quake displays more of the screen and is therefore harder to run but is more enjoyable for playing the actual game demo. All comparable benchmark results should be done with either Pro Quake or Pro Quake GL. Note the shortcut links expect the game data to be located @ D:\quake.
Quake Benchmark Shortcut Legend:
-wqpro-Benchmark (Pro Quake Software Benchmark)
-glpro-Benchmark (Pro Quake GL Benchmark)
-joequake-Benchmark (Joe Quake Software Benchmark)
-joequake-gl-Benchmark (Joe Quake GL Benchmark)
-winquake-Benchmark (Default software Benchmark)
Download the Doom and Quake Shareware package for Dosbox Turbo:
Troubleshooting:
Fallout 2 Notes:
-Fallout 2 should be played at the default resolution of 640x480, with a 8bit color depth for best results. Using higher resolutions or 16-32bit colors can cause the game to become unplayable.
-Killaps Restoration project version 2.2 can cause screen scrolling issues with some maps(Temple of Trials). Using the older 2.1.2b version fixes this problem and should be used instead of v2.2 until this problem can be fixed.
Download Killaps Fallout Restoration project 2.1.2b
Killaps Fallout 2 Restoration Project Main Page:
-Please report this problem to Killaps in his thread here and hopefully it will get fixed in his next release.
Vault-Tec Desktop:
-Win9x emulation can be unstable while exploring your emulated desktop. Opening multiple windows can cause crashing and lockups.
-By adding ISO/CD support windows becomes less stable and you should mount your ISO images right away.
-Once in a game state the Win9x emulation is more stable and you can enjoy classic PC gaming with reasonable stability.
-To maintain Win9x image stability I would recommend going to the start menu and shutting down after game sessions, before you exit the app.
CD/ISO support issues:
-Overtime using the ISO support can cause the img to stop working correctly. I would recommend making a back of the image once you have a game installed.
- If this happens you can copy the backed up image over to your device again. Your saved games will be located on the D HDD image and will be unaffected.
-The CD Rom support makes emulation less stable and can cause error messages when starting win9x with DosBox Turbo.
- If you experience errors simply exit and restart the app.
-There are alternatives to installing game data from the ISO.
-You can use the WinImage program to extract the ISO’s contents to a folder.
-This can be added to an HDD image and the setup exe run from inside of an emulated win9x environment.
-Many classic games can be run with a game fixes, that will allow you to play without the CD.
GameBurnWorld No-CD Game Fixes
-You can add CD/ISO support by downloading Daemon tools 3.47 here and installing the setup exe from inside of an emulated win9x environment.
-Once running win9x with Daemon tools disable autostart and automount or the image may crash when launching win9x.
How to Play Fallout 1 with Dosbox Turbo:
[video=youtube_share;lTruSMVWvYw]http://youtu.be/lTruSMVWvYw[/video]
Recommended System Requirements:
CPU Quad- Core, Dual-core 1.2Ghz+, equivalent or better.
GPU Adreno 220+, Nvidia Tegra2/3/4, equivalent or better.
Memory 1GB-2GB, Min=512MB. My Config asks for a min of 256MB & shouldn't be run on a device with less than 512MB.
8GB disk space
Minimum System Requirements:
1Ghz Single-Core CPU with 512MB of Ram
4GB Disk Space
Full Fallout 1 install instructions:
1)You will need to have the DosBox Turbo app installed on your Android device. Run the DosBox Turbo app and open the settings menu from either the pull down menu at the Top or left side swiping menu. Go to "DosBox Settings/Advanced DosBox Config" check "Manual Mode". You must restart the app before these changes will take effect.
2)Download and install Fallout 1 the game on your PC. I got it from a free promotion @ GOG
Fallout 1 directory Locations:
By default the GOG version of the game should be located at C:\GOG Games\Fallout
By default the CD or DVD version of the game should be located at C:\Program Files\BlackIsle\Fallout
3)Download and extract the Fallout 1 Dos files below. You will need to add these Dos files into the fallout 1 folder installed on your PC. Copy and paste them directly into that folder.
fallout1.1+Dos Patch download:
4)Download and extract the Fallout 1 configs files .zip below. Locate the fallout 1 config folder inside. Here you will find two different Fallout 1 configs to choose from. If you have a fast device place the config file from the "Config With Video & Ambient sounds" into your Fallout 1 install folder. If you have a slower device, or experience performance issues, then place the config file from the "Config without Video & Ambient sounds" into your Fallout 1 install folder. Once you have all the necessary files in the Fallout 1 folder copy and paste the entire folder into the Root directory or your Android device, this is the default location that opens when you plug in the USB cable and explore the device.
Download Fallout 1 & DosBox Turbo Config files. Notes:For all devices, 256MB mem, cycles set to default Max, Auto.exe:
Config V4.0 For all devices, 256MB mem, cycles set to default Max, Auto.exe :
Optional) Install the NPC patch: This allows you to edit your NPC follows weapons and inventory, like in Fallout 2. Download, extract and place the "Data" folder into your fallout 1 directory.
NPC mod Download:
5)Look Inside the Fallout 1 configs folder. The second folder called "DosBox Config" has a modified Dosbox Turbo Auto exe Config File. You will need to copy and paste it into the root directory of your Android device along with the Fallout 1 folder. Make sure you have done step 1 or this will not work and you will have to recopy the file after redoing step 1. The Root directory is in the internal memory, the default location that opens when you plug in the USB cable and explore the device. Now you are ready to launch the DosBox Turbo app from you Android device and begin your adventure into the Wasteland.
6)(Optional)Get the free Hackers Keyboard from the Play Store. It has a better layout for playing games and includes directional keys.
Using Virtual On Screen Buttons:
-In the DosBox settings menu check “Overlay Buttons”.
-Open “Button/Controller Maps” and choose “Add button Mapping”.
-A new label will appear, click it “Map custom Button (x)”
-At the top select 1 of 4 custom buttons to map
-Now select “Dos key mapping” and assign a key to the button.
-Once done select ok and repeat this for all 4 buttons.
-A good setup for playing fallout would be:
-Btn A=space, Btn B=b, Btn C=I, Btn D=s
-space=end turn, b=change hands, i=inventory, s=skill index,
-There is a Fast Forward button at the very bottom of the “Dos key mapping” menu, scroll down all the way.
-Map this key and you can hold it down to increase the cycles.
-This helps to speed up long load times, but note it will distort any audio that is playing.
Fallout 1&2 QEMU Android installation guide(Free App):
QEMU Version:
[video=youtube_share;hYTTrHbQcBo]http://youtu.be/hYTTrHbQcBo[/video]
Fallout 1&2 are now Fully playable on Android with all the sounds and music from the original game.
With the use of an Android X86 emulator QEMU, you will learn how to install and play your own copy of Fallout1or2 on Android.
Games are Not included! (Some Assembly Required)
Recommended System Requirements:
CPU Quad- Core, Dual-core 1.2Ghz+, equivalent or better.
GPU Adreno 220+, Nvidia Tegra2/3/4, equivalent or better.
2GB, 1GB, 512MB. My Config asks for a min or 256MB & shouldn't be run on a device with less than 512MB.
8GB disk space
Minimum System Requirements:
1Ghz Single-Core CPU with 512MB of Ram
GPU Adreno 220
4GB Disk Space
Note:If you only meet the minimum requirements, then see Step 6 and use the optional Fallout2 Config without Video & Ambient sounds.
Tested Devices: Note2, HP TouchPad, Galaxy s3, Galaxy s1 i9000
How to install Fallout on your Android device:
1)You will need Fallout 1or2 the game fully installed on a PC (Not provided here)
Download QEMU Emulator for Android:
2)a]Version 1.0 for Playing Fallout 2 Regular QEMU Download:
Or
2)b)Version 2.0 for Playing the Fallout 2 Restoration Project QEMU Download:
Note: Version 1.0 is more stable but will not work properly with the Restoration Project.
3)Getting Fallout 1 & 2 setup to Play on Android:
Fallout 2
-If you wish to play Fallout 2 I recommend installing Killap’s unofficial fallout 2 patch.
1) Download and Extract the Unofficial patch, open the folder.
2) Open the "main" folder and copy and paste these files into your Fallout 2 install directory. (yes to overwrite the files)
3) Open the "Windows 95-98-ME" folder and copy and paste these files into your Fallout 2 install directory. (yes to overwrite the files)
4) Open the “Batch_work’ folder and copy and paste these files into your Fallout 2 install directory. Run the "master_dat_fix_up.exe" file (A window will popup)
5) Next this is EXTREMELY important, in your Fallout 2 install directory delete a file called "patch000.dat"
6) Download and install one of my custom Fallout cfg files by copying and pasting it into your Fallout directory. These config files correct the game path for the sound data files.
a)Config With Video & Ambient sounds: This can improve screen scroll performance with and increased art_cache_size=256. You can also manually open the fallout2.cfg and change the value. I recommend 256, 512, or 768 (default=8).
b)Config without Video & Ambient sounds: This increases performance by removing ambient and video sounds. If you experience crashing when the videos play then, you will need this file. Note*NPC conversations will still have spoken dialogue.
Note: Fallout 2 should be played at the default resolution of 640x480, with a 8bit color depth in basic graphics mode for best results. Using higher resolutions with 16-32bit colors or using DirectX9/Direct draw 7 graphics modes can cause the game to become unplayable.
7) (Optional) You can also install Mash’s resolution patch: to increase your screen size.
Note This may impact game performance but allows you to see much more of the map at once.
Download Fallout2 Hi-Res Patch v3.06
Fallout 2 Restoration Project
Note(Important) The Fallout 2 Restoration Project requires a faster device to run than a regular install of Fallout2. A fast Dual or Quad core device with 2GB+ is Recommended
-If you wish to play Killaps Fallout 2 Restoration Project on Android then you must do the following.
1) Download and Extract the manual Restoration patch, open the folder.
2) Open the "main" folder and copy and paste these files into your Fallout 2 install directory. (yes to overwrite the files)
3) Open the "Windows 95-98-ME" folder and copy and paste these files into your Fallout 2 install directory. (yes to overwrite the files)
4) Open the “Batch_work’ folder and copy and paste these files into your Fallout 2 install directory. Run the "f2.bat" file (A window will popup)
5) Next this is EXTREMELY important, in your Fallout 2 install directory delete a file called "patch000.dat"
Fallout 2 Restoration Project Manual Version Download:
6) Download and install one of my custom Fallout cfg files by copying and pasting it into your Fallout directory. These config files correct the game path for the sound data files.
a)Config With Video & Ambient sounds: This can improve screen scroll performance with and increased art_cache_size=256. You can also manually open the fallout2.cfg and change the value. I recommend 256, 512, or 768 (default=8).
b)Config without Video & Ambient sounds: This increases performance by removing ambient and video sounds. If you experience crashing when the videos play then, you will need this file. Note*NPC conversations will still have spoken dialogue.
7) Download the citylimit49_mapper here and place it into your Fallout 2 follder. Run the exe to extract the files. (yes to overwrite the files)
-Look in the Fallout 2 folder for the F49+.exe file that was extracted and run it. It will fail to patch the mapper but will patch the Fallout.exe and allow us to play the restoration project. All done have fun.
Fallout 1
-If you wish to play Fallout 1 I recommend installing the Dos Patch and launching the game from the Dos exe file.
1)Download and install Fallout 1 the game on your PC. I got it from a free promotion @ GOG
2)Download and extract the Fallout 1 Dos files below. You will need to add these Dos files into the fallout 1 folder installed on your PC. Copy and paste them directly into that folder.
fallout1.1+Dos Patch download:
3) Download and install one of my custom Fallout 1 cfg files by copying and pasting it into your Fallout 1 directory. These config files correct the game path for the sound data files.
-There are two different config files. The one without video & ambient noise is for slower devices that just meet the Min system requirements or have performance issues.
4)Optional) I also installed this NPC patch from the no mutants allowed website. This allows you to edit your follows weapons and inventory, like Fallout 2. Download and extract these files into the Data folder in your fallout 1 directory.
NPC mod Download:
4) Download and Extract either the 2GB or 1GB empty HDD.img files to an easy to find location on your PC. Bigger is Better, for improved stability! Default is 2GB.
5) Install the free 30 day trial of WinImage and run the application. Be sure to use it before 30 days passes.
WinImage 9.00 Download:
6) Open the empty HDD.img by dragging it into the open Winimage program. Or navigating to it from file/open
7) Locate your fully installed Fallout 1 or 2 game folder. Transfer the Fallout game folder into the HDD.img and save it. This should include Killaps Patches and Mash’s resolution patch. I would recommend playing at 640x480 if you have a dual core device. You can attempt 800x600 or 1024x768 if you have a quad core device. Single core devices should use my No Video or Ambient noise Fallout cfg.
(Optional) You can install one of my custom Fallout cfg files by copying and pasting it into the Fallout directory.
a)Config With Video & Ambient sounds: This is recommend to improve screen scroll performance and sound compatibility.
b)Config without Video & Ambient sounds: This has the same sound tweaks but further increases performance by removing ambient and video noises. Note*NPC conversations will still have spoken dialogue.
7) Save your new HDD.img and close the program.
8)Copy and paste your new Fallout2 HDD.img into the SDL folder in your downloads.
9)Transfer the sdl folder to your devices internal memory. This will be the location that opens when you plug in the USB cable.
10)Transfer the libSDL.apk to your device and install it. Note* you may need to Enable 'Unknown Sources' from Settings/Security/Enable.
11)Run the libSDL.apk and start windows. Skip scan disk if it comes up.
12)Play Fallout2 on Android and wander the wasteland.
(Optional) Interface Apps:
(Optional) GameKeyboard app that lets you make onscreen buttons and choose the keys:
(Optional)Get the free Hackers Keyboard from the Play Store. It has a better layout for playing games and includes directional keys.
Notes(Important)
SDL cfg File:
-Located in the sdl folder you will find the sdl.cfg file. This allows you to edit the instructions given to the emulator.
-You can edit and save changes to this file using notepad.
-Here is the default line for the sdl.cfg file.
/sdl -L . -m 256 -boot c -hda c.img -hdb HDD_2Gb.img -usb -usbdevice tablet -soundhw sb16
-You can increase or decrease the Memory –m 128 or 256 or 512+(recommended)
-The Default is 256MB for compatibility.
-Set the emulated Memory size to half of your total system Memory size. So if your device has 1GB of DDR use the 512 setting.
-You can change the name of the HDD –hdb HDD_2Gb.img Note*It Must match the exact name in your sdl.cfg file.
-Add additional HDD’s by adding sequentially lettered –hd(x) Like so
- /sdl -L . -m 256 -boot c –hda c.img –hdb hdd_2Gb.img –hdc hdd_2Gb.img –hde hdd_2Gb.img… ect
-The default is HDD_2Gb.img but you can edit the file with notepad. Just change the 2 to a 1, to use the HDD_1Gb.img, save and exit.
Extra HDD for Virtual Memory:
-I would highly recommended attaching a 1/2GB HDD used only for virtual memory. You can use the Virtual Memory sdl cfg line below.
-Once you are running the emulator right click on the vault 13 desktop icon and choose properties, select the performance tab. -Next select “virtual memory” at the bottom, click “Let me specify my own virtual memory settings” and select the HDD you attached.
-It will prompt you to reboot once you exit. Don’t reboot, choose no, and then shutdown and re-launch the emulator.
-This will help to keep System Resources between 98-99% free. This helps to optimize the performance and improve stability.
-You can check the performance by right clicking on the desktop vault computer and selecting properties. Navigate to the performance tab at the top and look for “System Resources:98%free”.
Virtual Memory sdl cfg:
/sdl -L . -m 512 -boot c -hda c.img -hdb HDD_2Gb.img -hdc HDD_1Gb.img -usb -usbdevice tablet -soundhw sb16
Overclocking:
-You will need to be rooted in order to Overclock your device. Increasing your CPU speed can have a large impact on performance and could make games playable on older devices.
-Get a free overclocking app from the Play Store such as AnTuTu's CPU Master (free). Open the app and increase the speed in small increments of 100-200Mhz and then run AnTuTu's Benchmark to check stability and performance. Once you've found a stable overclock start up QEMU and have fun.
Troubleshooting:
-You must click the volume bottom before you can move the mouse.
-To help maintain stability try and minimize back ground app activity while running Fallout.
Note*Fallout1&2 runs reasonably stable. Reasonably stable = testers report gaming session of 1-3hrs.
Tweaking the CPU Settings:
Increasing the minimum CPU frequency may help to improve stability. You can use the free CPU Master App. Also set the CPU governor to Performance or on demand. Don’t forget to set it back to normal after your finished exploring the wasteland.
CPU Master Play Store (free app):
Links:
How to Play Baldur’s gate on Android [XDA Thread]
How to Play Baldur’s gate on Android [Video]
GameBurnWorld No-CD Game Fixes
Fallout 1 Patches @ No Mutants Allowed:
Fallout 2 Patches @ No Mutants Allowed:
Fallout 2 Restoration Project Main Page:

[video=youtube_share;Co78pPKakkI]https://youtu.be/Co78pPKakkI[/video]
[Guide+Video]How to Play Classic PC Games on Android with Exagear RPG/Strategies(XDA)
Additional resources:
-ExaGear RPG main page
-ExaGear Strategies main page
-Exagear RPG/Strategies Playable game list Here
-Join the ExaGear RPG Beta Testing community Here
-Join the ExaGear Strategies Beta Testing community Here
-Follow the Google+ pinned post for Beta testing community
[Guide+Video] How to Play PC Games on Android with DosBox Turbo
Note: If your device is unable to run ExaGear try Dosbox Turbo, it will run similar games.
What is ExaGear?
ExaGear is a complex emulation engine app that allows you to play many classic PC games on your Android device. It features one the most powerful emulated systems on Android and is relatively easy to setup. Official games have controller sets specially adapted for gaming on your mobile device. In addition many unofficially supported games are playable with the help of customs controllers and apps. The following guide will explain how to setup and play Games with ExaGear.
Emulated PC Gaming System
CPU: 1Ghz Pentium 3 (Core # Varies)
GPU: 130MB Wine DirectDraw
HDD: Emulated to the size of your devices internal storage.
RAM: Emulated to the size of your devices RAM
-ExaGear system DxDiag on my Note 2
Games are Not included! (Some Assembly Required)
How to Play Classic PC Games on Android with Exagear RPG/Strategies
1)Install the ExaGear RPG or ExaGear Strategies app on your Android device. Open the app from the device for the first time to unpack data and create the default Exagear folders in the internal storage. A basic set of instructions will be shown prompting you to transfer game data to the device. No Games are included with the app. ExaGear is offered as a free trial for 3days after a game is first started. Once the trial expires you can purchase a controller set or use short 10 minute gameplay sessions.
2)A)Select an Officially supported game from the "Officially supported Games and controller types:" list below and view the recommended controls for that game.
Or
2)B)Select an Unofficially supported game from the Launched game list here and select a game that might be playable but could require additional modifications and controller setup covered in the, "How to setup Unofficially supported Games and Controls:" guide below.
Freshly install the selected game on your PC with the latest patches, I recommend GOG DRM free games but older CD/DVD versions work fine but may need NOCD games fixes. After fully installing and patching your games ,locate the install folder(s).
Officially supported Games and controller types:
ExaGear RPG
Current controls are customized and adapted for:
• Arcanum (Argentum controls are recommended)
• Fallout 1, 2, (Ferrum controls are recommended)
• Jagged Alliance 2 (Alluminium controls are recommendedl)
• Might and Magic VI, VII, VIII (Magnesium controls are recommended)
ExaGear Strategies
Current controls are customized and adapted for:
• Disciples 2 (Helium controls are recommended)
• Heroes of Might and Magic 3 (Helium controls are recommended)
• Panzer General 2 (Helium controls are recommended)
• Civilization 3 (Cuprum controls are recommended)
3) Plug your android device into the PC with the USB cable and locate the "ExaGear" folder you created when running the app for the first time. The ExaGear RPG and ExaGear Strategies apps share the same "ExaGear" folder located in the root directory of your internal storage(Default location). If you wish to use an external SDcard for storage, create an "ExaGear" folder on the SDcard. Place your games folders into the "ExaGear" app folder in either location and your games be will automatically detected by the app. Please stand by while the game data transfers to your android device, this may take sometime....Wait for it. Once complete you may disconnect the USB cable. Alternately you could download the game data directly to the device and place it into an ExaGear folder with afile explorer program.
Possible DVD\CD\GOG Default game data locations:
C:\Program Files (x86)\ (Game or Company Name)
C:\Program Files (x86)\GOG Games\ (Game or Company Name)
C:\Program Files\ (Game or Company Name)
C:\GOG Games\ (Game Name)
C:\Sierra\ (Game Name)
4)Locate and start the Exagear RPG/Strategies app from your android device. Click "Show unsupported executables.." to show .exe files for games not officially supported. You will need to Select the .exe and controller type for the game you wish to launch, select trial or buy the controller set to launch it. You can edit the exe's default run config by selecting the three dots. Here you can change the default Resolution, Color Depth and Controller type. Once you've selected your defaults the game will load, please stand by..
How to setup Unofficially supported Games and Controls:
Review the Exagear RPG/Strategies list of Launched games here and choose a game you wish to play. The column titles are in Russian and contain useful information for setting up your games. See the picture below for reference and translation.
Spreadsheet translation columns:
-C= Version, D= The Game, E= Suggested exe rename, F= Resolution, G= Color Depth, H= Language Encoding, I= Comments/Notes
-Refer to column E, you may need to rename the unsupported game exe(s) to one that is supported.
-Locate the game data folder, make a copy of the exe file and rename it.
-Changing unsupported exe names can enable the game to be launched with ExaGear.
-Refer to column I, you will need to Download a dsound.dll here and place it into your game folder. Sound.dll Archive here.
-Refer to column F & G, you can change default Resolution and Color Depth from the run config menu. From app main click the 3dots by the exe name and set default values for games.
How to Add custom controls
-Many games are playable but not yet officially supported by ExaGear.
-Setting up custom onscreen controls or using Bluetooth/OTG devices can help make games playable on your device.
-I recommend adding custom onscreen controls with the paid GameKeyboard + app Here:
-Follow the apps setup instructions
-Customize the onscreen controls
-Reduce the transparency to better see the game with the onscreen overlay.
-Enable Non-Blocking mode so that the onscreen controls won't block ExaGears touchscreen input.
-GameKeyboard + Screenshot with Arcanum Setup.
How to Patch and Play Games with ExaGear RPG/Strategies:
How to use Fallout Mods with ExaGear RPG
-I recommend using the GOG versions of fallout 1 and 2 but the CD and DVD versions should work fine. I don't believe the steam versions work.
-Locate your Fallout 1 or 2 game data folder in order to begin patching it. Get your copy of Fallout 1 or 2 setup with the latest patches and win9x compatibility by following the below instructions.
Note:The below setup instructions for Fallout 2 and the Restoration Project will get the game working on Android but may cause it not to run properly on your PC. To reverse this just go back to step 3 in the following setup instructions and overwrite the "Windows 95-98-ME" files with the newer "Windows XP-VISTA-7" files from Killaps Fallout 2 manual patch folder.
Note: Patching your game or installing the restoration project will require you to start a new game of Fallout.
Fallout 1/Fixt Mod
Download Fallout Fixt patch Alpha 6.7.2 FIXES ONLY from the main page here.
Note: Launch Fallout Fixt from the FALLOUTW.exe file.
Note: The Alpha 6.7.2 FULL CUSTOM install version of the patch caused some issues stick with the fixes only patch for ExaGear RPG.
-Goal of Fallout Fixt: "To enhance, fix and improve the Fallout 1 experience. This includes fixing bugs, restoring features, modifying balance, adding features, and many fixes to text/dialog. In addition to that, all other available mods and patches are rolled into Fixt, meaning that Fallout Fixt is the only thing needed for "the best" Fallout 1 experience. As of the most recent version, this mod fixes roughly 150 bugs still present in the unofficial patches, and adds roughly 170 features. In addition, there are hundreds if not thousands of text&dialog fixes."
(Optional)Download and extract my custom Fallout cfg files here then copying and paste it into your Fallout directory. These config files correct the game path for the sound data files. If you have issues with the game launching and crashing try this.
Fallout 2
-If you wish to play Fallout 2 I recommend installing Killap’s unofficial fallout 2 patch.
1) Download and Extract the Unofficial patch, open the folder.
2) Open the extracted patch folder, copy the "data" folder and paste it into your Fallout 2 install directory. (yes to overwrite the files)
3) Open the "Windows 95-98-ME" folder and copy and paste these files into your Fallout 2 install directory. (yes to overwrite the files)
4) Open the “Batch_work’ folder and copy and paste these files into your Fallout 2 install directory. Run the "master_dat_fix_up.exe" file (A window will popup, wait for it..)
5) Next this is EXTREMELY important, in your Fallout 2 install directory delete a file called "patch000.dat"
6) Download and extract my custom Fallout cfg files here then copying and paste it into your Fallout directory. These config files correct the game path for the sound data files.
Fallout 2 Restoration Project Install Guide:
-If you wish to play Killaps Fallout 2 Restoration Project with Exagear RPG then do the following.
1) Download and Extract the manual Restoration patch(latest version Here), open the folder.
2) Open the "main" folder and copy and paste these files into your Fallout 2 install directory. (yes to overwrite the files)
3) Open the "Windows 95-98-ME" folder and copy and paste these files into your Fallout 2 install directory. (yes to overwrite the files)
4) Open the “Batch_work’ folder and copy and paste these files into your Fallout 2 install directory. Run the "f2.bat" file (A window will popup, wait for it..)
5) Next this is EXTREMELY important, in your Fallout 2 install directory delete a file called "patch000.dat"
6) Download and extract Mash’s older resolution patch Fallout2 Hi-Res Patch v3.06 here: Paste the contents of the folder into your fallout 2 folder and replace the files.
7) Download and extract my custom Fallout cfg files here then copying and paste it into your Fallout directory. These config files correct the game path for the sound data files.
Fallout Tactics
-Show the hidden BOS game exe, it launches normally.
-Use the ‘Ferrum’ controls.
-Set the game to run at 800x600 16bbps before running the exe. from the main menu.
Enjoy wandering the Restored wasteland with Exagear RPG.
Arcanum
Set the game to run at 800x600 16bbps before running the exe. from the main menu.
-Unofficial Arcanum Patch v091225 worked with android
-Index of Arcanum Mods and Patches here
Diablo 2(LOD)
-Rename the Diablo 2 exe to fallout2.exe (Optional)
-You will need to place one of these additional sound files for Exagear RPG/Strategies
- Download and place this sound.dll file into your Diablo 2 game folder.
Troubleshooting:
-If you experience issues loading saved games try creating a new game and make sure your data is in the internal storage. Android 4.4..x Kitkat introduced a number of read write restrictions for apps files not located in the downloads folder. The app developer is working to sort out such issues but fixes could take time. Contact the developer here if you have purchased the app but can't play a game properly on your device @ support@eltechs.com or from the links on Play store page here.
-Support for image files is still being worked on.

Hello Android gamers today we will be learning how to play PC games on Android with the App DosBox Turbo, the best and fastest Dos Emulator for Android. Recent developments have brought improved Win9x emulation to DosBox Turbo, such as Voodoo 1support. I have been working with the excellent developer Fishstix to bring my Fallout for Android Win9x solution to DosBox Turbo. After much beta testing we present you with our win 9X solution for gaming on Android. Your emulated Vault 13 computer can run many old school classics, including the first 3 fallout games.
Fallout the game is Not included! (Some Assembly Required)
XDA Thread DosBox Turbo Version:
XDA Thread QEMU Version:
DosBox Turbo Version Videos:
[video=youtube_share;f21K1Exq2jA]http://youtu.be/f21K1Exq2jA[/video]
[video=youtube_share;aAsFVUL0b_w]http://youtu.be/aAsFVUL0b_w[/video]
[video=youtube_share;HQUqMC5G5Ak]http://youtu.be/HQUqMC5G5Ak[/video]
Fallout installation guide for DosBox Turbo (Paid App)
Emulated Android PC Performance
Recommended System Requirements:
CPU Quad- Core, Dual-core 1.2Ghz+, equivalent or better.
GPU Adreno 220+, Nvidia Tegra2/3/4, equivalent or better.
2GB, 1GB, 512MB. My Config asks for a min or 256MB & shouldn't be run on a device with less than 512MB.
8GB disk space
Minimum System Requirements:
1Ghz Single-Core CPU with 512MB of Ram
GPU Adreno 220
4GB Disk Space
Android to PC hardware conversion:
Quad Core Samsung Exynos (1.6 Ghz - Samsung Galaxy Note II) ~ Pentium 75 - 90
Quad Core Nvidia Tegra3 CPU (1.5Ghz) ~ Pentium 60-75Mhz
Dual Core Nvidia Tegra2 CPU (1Ghz) ~ 486@66-80Mhz
Dual Core A9/Exynos Processor (Samsung Galaxy II @ 1.2Ghz) ~ 486@75-90Mhz
Dual Core Qualcomm Snapdragon S3 (MSM8260 1.5Ghz) ~ 486@50Mhz
Single Core Generic Cortex A8 (1Ghz) ~ 486@33-40Mhz
Note: Emulated Graphics = 3Dfx Voodoo 1 4MB (3D) and S3 Trio64V+ 4MB (2D)
DosBox Turbo main information page
DosBox Turbo Performance Page
DosBox Turbo Win9x Installation guide:
1)a]You will need to have the DosBox Turbo app installed on your Android device. Run the DosBox Turbo app and open the settings menu from either the pull down menu at the Top or left side swiping menu. Go to “DosBox Settings/Advanced DosBox Config” check “3DFX Glide Support” and “Manual Mode”. You must restart the app before these changes will take effect.
DosBox Turbo Play Store Link:
b]Attention Dosbox Turbo Users there have been some recent changes to the default directory paths. Due to these changes you will now need to change the directory path back to the old default or place the dosbox config into the new location in step 7. You can change the default location now by selecting “Config location” right under where you selected manual mode. You will see a directory path similar to the one below. Note the beginning of the path can vary depending on the type of device used.
Default manual mode config file directory path:
/<path to sdcard>/android/data/com.fishstix.dosbox/files/dosbox.conf
On my Note 2:
/storage/emulated/0/android/data/com.fishstix.dosbox/files/dosbox.conf
Remove the part from between the dosbox.conf and the root directory of your internal memory(Aka the primary external SDcard):
Before:
/<path to sdcard>/android/data/com.fishstix.dosbox/files/dosbox.conf
After:
/<path to sdcard>/dosbox.conf
On my Note 2:
Before:
/storage/emulated/0/android/data/com.fishstix.dosbox/files/dosbox.conf
After:
/storage/emulated/0/dosbox.conf
New Default paths for dosbox turbo files and folders:
Default manual mode config file:
/<path to sdcard>/Android/data/com.fishstix.dosbox/files/dosbox.conf
Default location for the manager app launcher config:
/<path to sdcard>/Android/data/com.fishstix.dosboxlauncher/files/dosbox/<game name>.conf
Default dos game space that is mounted as C:
/<path to sdcard>/Download/
-Click to see the pic.
DosBox Turbo Win9x Gaming Package Downloads:
2)a] Version 1.0 is the most stable but lacks Win9x CD/ISO support. Use this version to Play games that don’t require the use of CD’s i.e. mounted ISO images.
Or
2)b] Version 2.0 is less stable due to the Win9x CD/ISO support. Use this version to Play games that require the use of CD’s i.e. mounted ISO images.
Notes:
-The CD Rom support makes emulation less stable and can cause error messages when starting win9x with DosBox Turbo.
- If you experience errors simply exit and restart the app.
-To use ISO files they must be located within a folder before transferring them to the HDD.img.
-If the ISO is not located in a folder it will attempt to fill the HDD image and won't work correctly.
-There are alternatives to installing game data from the ISO.
-You can use the WinImage program to extract the ISO’s contents to a folder.
-This can be added to an HDD image and the setup exe run from inside of an emulated win9x environment.
-Many classic games can be run with a Game Fixes, that will allow you to play without the CD.
GameBurnWorld No-CD Game Fixes
Or
2)c] Version 3.0 runs slightly faster since its based on win95 but only has DX8.0 support and therefore doesn't run as many games as V1.0. Use this version to play games on a slower device that don't require DX9C support.
3) Install the free 30 day trial of WinImage and run the application. Be sure to use it before 30 days passes. This program will allow you to open and save your game data to your empty hdd .img files.
WinImage 9.00 Download:
4) Open your downloaded package and look for the hdd folder. Inside you will find the empty hdd images files to store your games and ISO’s. Extract the default hdd-2gb image file and open the folder.
(Optional) If you wish to change the size of the image file you are using, then you must also change the name and drive geometry in the dosbox.conf file.
Default hdd line in the dosbox.conf file:
imgmount d: /sdcard/hdd-2gb.img -t hdd -fs fat -size 512,63,64,1023
Change the hdd name and drive geometry in the dosbox.conf file:
imgmount d: /sdcard/hdd-1gb.img -t hdd -fs fat -size 512,63,64,520
Driver Geometry:
2GB image: 512,63,64,1023
1GB image: 512,63,64,520
512MB image: 512,63,32,520
256MB image: 512,63,16,520
(Optional) If you wish to store the hdd onto an SDcard instead of the devices internal memory, then open the dosbox.conf file and change the following.
Default hdd line in the dosbox.conf file:
imgmount d: /sdcard/hdd-2gb.img -t hdd -fs fat -size 512,63,64,1023
Change the SDcard path to the HDD image:
imgmount d: /mnt/sdcard1/hdd-2gb.img -t hdd -fs fat -size 512,63,64,1023
or
imgmount d: /mnt/extsdcard/hdd-2gb.img -t hdd -fs fat -size 512,63,64,1023
or
imgmount d: /storage/extSdCard/hdd-2gb.img -t hdd -fs fat -size 512,63,64,1023
5) Now that WinImage is installed you can open the empty hdd.img’s by double clicking them, dragging them into the open WinImage program, Or find them from the WinImage menu file/open.
6) Locate your fully installed games such as DRM free GOG games, ISO images or extracted game data. Drag the folder(s) containing this data into the opened hdd image files. Save your new hdd.img and close the program.
7) Plug your Android device into your PC with the USB cable and open your devices internal memory. This is the area that opens by default from your computer with the USB cable, all your android data is located here. Transfer the hdd.img, c.img, and dosbox.conf, files into this space; note that none of these files should be located in a folder.
8) Once the data is on your android device you can disconnect the USB cable. Now you can start the DosBox Turbo app and play your retro PC games on android, have fun.
9)(Optional)Get the free Hackers Keyboard from the Play Store. It has a better layout for playing games and includes directional keys.

How to use Version 2.0 with CD/ISO support:
1)Start the Daemon tools program by click the desktop icon.
2)Tap the Icon that will appear in the bottom right corner.
-Select “Device 0: [E:] No media”
3)Find your ISO image and select it
-Auto play should now start your CD.
Note:To use ISO files they must be located within a folder before transferring them to the HDD.img.
-If the ISO is not located in a folder it will attempt to fill the HDD image and won't work correctly.

Use this to Play Games like, Star Wars Jedi Knight: Dark Forces II.This video demonstrates how to mount the ISO images using Daemon tools@1:28..
[video=youtube_share;jet3hYxpQdc]http://youtu.be/jet3hYxpQdc[/video]
How to setup Fallout 2/Restoration Project and Fallout Tactics:
Fallout 1 Dos Guide + Video
Fallout 1 is best played without win9x since Dosbox turbo is a Dos Emulator.
Click here for the How to Play Fallout 1 with Dos guide
Fallout 2 Regular
-If you wish to play Fallout 2 I recommend installing Killap’s unofficial fallout 2 patch.
1) Download and Extract the Unofficial patch, open the folder.
2) Open the extracted patch folder, copy the "data" folder and paste it into your Fallout 2 install directory. (yes to overwrite the files)
3) Open the "Windows 95-98-ME" folder and copy and paste these files into your Fallout 2 install directory. (yes to overwrite the files)
4) Open the “Batch_work’ folder and copy and paste these files into your Fallout 2 install directory. Run the "master_dat_fix_up.exe" file (A window will popup)
5) Next this is EXTREMELY important, in your Fallout 2 install directory delete a file called "patch000.dat"
6) Download and install one of my custom Fallout cfg files by copying and pasting it into your Fallout directory. These config files correct the game path for the sound data files.
a)Config With Video & Ambient sounds: This can improve screen scroll performance with and increased art_cache_size=256. You can also manually open the fallout2.cfg and change the value. I recommend 256, 512, or 768 (default=8).
b)Config without Video & Ambient sounds: This increases performance by removing ambient and video sounds. If you experience crashing when the videos play then, you will need this file. Note*NPC conversations will still have spoken dialogue.
Note: Fallout 2 should be played at the default resolution of 640x480, with a 8bit color depth in basic graphics mode for best results. Using higher resolutions with 16-32bit colors or using DirectX9/Direct draw 7 graphics modes can cause the game to become unplayable.
7) (Optional) You can also install Mash’s resolution patch: to increase your screen size.
Note This may impact game performance but allows you to see much more of the map at once.
Download Fallout2 Hi-Res Patch v3.06
Fallout 2 Restoration Project
Note(Important) The Fallout 2 Restoration Project requires a faster device to run than a regular install of Fallout2. A Quad core device with 2GB+ is required
-If you wish to play Killaps Fallout 2 Restoration Project on Android then you must do the following.
1) Download and Extract the manual Restoration patch, open the folder.
2) Open the "data" folder and copy and paste these files into your Fallout 2 install directory. (yes to overwrite the files)
3) Open the "Windows 95-98-ME" folder and copy and paste these files into your Fallout 2 install directory. (yes to overwrite the files)
4) Open the “Batch_work’ folder and copy and paste these files into your Fallout 2 install directory. Run the "f2.bat" file (A window will popup)
5) Next this is EXTREMELY important, in your Fallout 2 install directory delete a file called "patch000.dat"
Fallout 2 Restoration Project Manual Version Download:
6) Download and install one of my custom Fallout cfg files by copying and pasting it into your Fallout directory. These config files correct the game path for the sound data files.
a)Config With Video & Ambient sounds: This can improve screen scroll performance with and increased art_cache_size=256. You can also manually open the fallout2.cfg and change the value. I recommend 256, 512, or 768 (default=8).
b)Config without Video & Ambient sounds: This increases performance by removing ambient and video sounds. If you experience crashing when the videos play then, you will need this file. Note*NPC conversations will still have spoken dialogue.
Note: Fallout 2 should be played at the default resolution of 640x480, with a 8bit color depth in basic graphics mode for best results. Using higher resolutions with 16-32bit colors or using DirectX9/Direct draw 7 graphics modes can cause the game to become unplayable.
Fallout Tactics
-In order to make Fallout Tactics playable on Android you will need to remove ambient sounds from the game.
-You can also remove videos since they don’t currently run properly and just take up extra space.
-How to remove ambient Sounds and Optimize files:
-Use Odin’s Booster app to modify the audio files so ambient sounds can be deleted.
-Run Boost "Browse" to your FT directory. Next select sound_o.bos and sound_amb.bos under "files to optimize".Click on "Optimize!"
-In the Fallout Tactics install Folder:
-Delete the ambient sounds folder from the fallout tactics/core/sounds/ambient
-Delete intro movie from fallout tactics/core/movies/intro.bik
Odin's FT Booster utility,"allows faster, smoother scrolling & much less disk usage":
[video] Fallout Tactics on Android with DosBox Turbo
Using Virtual On Screen Buttons:
-In the DosBox settings menu check “Overlay Buttons”.
-Open “Button/Controller Maps” and choose “Add button Mapping”.
-A new label will appear, click it “Map custom Button (x)”
-At the top select 1 of 4 custom buttons to map
-Now select “Dos key mapping” and assign a key to the button.
-Once done select ok and repeat this for all 4 buttons.
-A good setup for playing fallout would be:
-Btn A=space, Btn B=b, Btn C=I, Btn D=s
-space=end turn, b=change hands, i=inventory, s=skill index,
-There is a Fast Forward button at the very bottom of the “Dos key mapping” menu, scroll down all the way.
-Map this key and you can hold it down to increase the cycles.
-This helps to speed up long load times, but note it will distort any audio that is playing.

DosBox Turbo Performance Tweaking:
-If your android device has 1GB of memory or more, then you can increase the usable memory from the default of 256MB to 512MB.
-Open the dosbox.conf file and change the value to memsize=512
-Once the value is save the changes and transfer the dosbox.conf file over to your device.
-Increasing the memory can improve stability and performance.
Before:
[dosbox]
memsize=256
machine=svga_s3
After:
[dosbox]
memsize=512
machine=svga_s3
Overclocking:
-You will need to be rooted in order to Overclock your device. Increasing your CPU speed can have a large impact on performance and could make games playable on older devices.
-Get a free overclocking app from the Play Store such as AnTuTu's CPU Master (free). Open the app and increase the speed in small increments of 100-200Mhz and then run AnTuTu's Benchmark to check stability and performance. Once you've found a stable overclock start up Dosbox and have fun.
Extra HDD space for Virtual Memory:
-Using a 1/2GB HDD and then allocating free space for for virtual memory, could help to improve performance.
-Once you're running win9x right click on the vault 13 desktop icon and choose properties, select the performance tab,“virtual memory” at the bottom, click “Let me specify my own virtual memory settings”. Select the HDD and specify the amount of space you want to use for virtual memory.
-It will prompt you to reboot once you exit. Don’t reboot, choose no, and then shutdown and re-launch the emulator.
-This will help to keep System Resources between 98-99% free, this helps to optimize the performance.
-You can check the performance by right clicking on the Vault 13 desktop icon and selecting properties. Navigate to the performance tab at the top and look for “System Resources:98%free”.
DosBox Turbo Quick Menu:
-You can access the quick menu by swiping the left side of the screen.
- This will give you access to quick settings and toggles for your input devices.
-To improve load times you can select “Cycles” and increase this number.
-By default it will be on Auto, which gives the best balance between sound quality and performance.
-Increasing this will cause the games to load faster but can badly distort the sound.
-You can Toggle this up in games that have long load times.
- Set the Cycles back to Auto once your game has loaded.
-You can also disable the sound in the DosbBox settings and play with increased cycles.
-This will significantly improve performance on slower devices.

How to Benchmark Dosbox Turbo:
Dos Doom Shareware Benchmarking:
In order to get comparable results for every device, the Doom 1 timedemo 3 is used as the main benchmark for Dosbox turbo. To ensure that the results are accurate all users should use the Doom1 Shareware v1.9 in conjunction with a preset Dosbox config file. The config file will automatically run the test and display the results.
Doom time demo results will be displayed as gameticks and realticks. In order to calculate the average Frames per second (FPS) we will enter these results into this equation 35(gameticks/realticks). The gameticks will always be 2134 for the Doom Shareware V1.9. If you have a different number then you aren’t using this version and results will not be comparable. Compare you results with those on theDosbox Turbo performance page here:
1) You will need to have the DosBox Turbo app installed on your Android device. Run DosBox Turbo and open the settings menu from either the pull down menu at the Top or left side swiping menu. Go to “DosBox Settings/Advanced DosBox Config” check “Manual Mode”. You must restart the app before these changes will take effect.
2) Download the Doom v1.9 shareware and config with Auto exe. Copy this file and folder into your internal storage space. This is the area that opens by default from your computer with the USB cable, all your android data is located here. The folder should be called doom and have all the data contained within. If it doesn't run you can manually run the test by launching Doom, bringing up the console by pressing (`)and typing “timedemo demo 3”.
3) Launch the Dosbox Turbo app from your device and Doom will start and run time demo 3. Once complete you will see your results that you can calculate your average FPS from. Round up your results to the nearest 0.1FPS.

4)Compare you results with the chart on the DosBox Turbo Performance Page

Multiplatform benchmarking with Quake 1 in Win9x and Dos:
Faster devices can use the Quake 1 timedemo in both Dos and win9x. This will allow you compare performance between Dos, win9x and win9x with Glide 3Dfx support. Results will be displayed as an average frames per second (FPS). Dosbox Auto exe configs can be used for Dos benchmarks and automated benchmark shortcuts are used for win9x.
1) You will need to have the DosBox Turbo app installed on your Android device. Run the DosBox Turbo app and open the settings menu from either the pull down menu at the Top or left side swiping menu. Go to “DosBox Settings/Advanced DosBox Config” check “3DFX Glide Support” and “Manual Mode”. You must restart the app before these changes will take effect.
2) Download the Quake shareware demo and config files. Copy the Quake folder into your devices internal storage space. This is the area that opens by default from your computer with the USB cable, all your android data is located here. The folder should be called quake and have all the data contained within.
3) To run the Quake 1 Dos benchmark, copy the Quake Dos config from the folder onto your device. Launch the Dosbox Turbo app from your device and Quake will start and run the time demo via the auto exe. Once complete you will see your results as an average FPS. If it doesn’t start you can manually run the test by launching Quake, bringing up the console by pressing(`) and typing “timedemo demo1”.
4) To run the Quake win9x benchmark copy the Quake win9x config from the folder onto your device. Place the Quake shareware demo folder into your HDD image, save it and transfer it to the device. This is the same procedure covered in the video for playing PC games with Dosbox Turbo. Launch the app to start win9x, open the shortcut to D and find the Quake folder. Inside this folder you will find several benchmark shortcuts for both regular quake and GL quake. Two Quake mods have been added to the folder to enable 3DfX glide support, Pro quake and Joe quake. Run one of these shortcuts to automatically start the benchmark and display results once complete. Note Pro Quake is the recommended benchmark for Quake in win9x. Joe Quake displays more of the screen and is therefore harder to run but is more enjoyable for playing the actual game demo. All comparable benchmark results should be done with either Pro Quake or Pro Quake GL. Note the shortcut links expect the game data to be located @ D:\quake.
Quake Benchmark Shortcut Legend:
-wqpro-Benchmark (Pro Quake Software Benchmark)
-glpro-Benchmark (Pro Quake GL Benchmark)
-joequake-Benchmark (Joe Quake Software Benchmark)
-joequake-gl-Benchmark (Joe Quake GL Benchmark)
-winquake-Benchmark (Default software Benchmark)
Download the Doom and Quake Shareware package for Dosbox Turbo:
Troubleshooting:
Fallout 2 Notes:
-Fallout 2 should be played at the default resolution of 640x480, with a 8bit color depth for best results. Using higher resolutions or 16-32bit colors can cause the game to become unplayable.
-Killaps Restoration project version 2.2 can cause screen scrolling issues with some maps(Temple of Trials). Using the older 2.1.2b version fixes this problem and should be used instead of v2.2 until this problem can be fixed.
Download Killaps Fallout Restoration project 2.1.2b
Killaps Fallout 2 Restoration Project Main Page:
-Please report this problem to Killaps in his thread here and hopefully it will get fixed in his next release.
Vault-Tec Desktop:
-Win9x emulation can be unstable while exploring your emulated desktop. Opening multiple windows can cause crashing and lockups.
-By adding ISO/CD support windows becomes less stable and you should mount your ISO images right away.
-Once in a game state the Win9x emulation is more stable and you can enjoy classic PC gaming with reasonable stability.
-To maintain Win9x image stability I would recommend going to the start menu and shutting down after game sessions, before you exit the app.
CD/ISO support issues:
-Overtime using the ISO support can cause the img to stop working correctly. I would recommend making a back of the image once you have a game installed.
- If this happens you can copy the backed up image over to your device again. Your saved games will be located on the D HDD image and will be unaffected.
-The CD Rom support makes emulation less stable and can cause error messages when starting win9x with DosBox Turbo.
- If you experience errors simply exit and restart the app.
-There are alternatives to installing game data from the ISO.
-You can use the WinImage program to extract the ISO’s contents to a folder.
-This can be added to an HDD image and the setup exe run from inside of an emulated win9x environment.
-Many classic games can be run with a game fixes, that will allow you to play without the CD.
GameBurnWorld No-CD Game Fixes
-You can add CD/ISO support by downloading Daemon tools 3.47 here and installing the setup exe from inside of an emulated win9x environment.
-Once running win9x with Daemon tools disable autostart and automount or the image may crash when launching win9x.
How to Play Fallout 1 with Dosbox Turbo:
[video=youtube_share;lTruSMVWvYw]http://youtu.be/lTruSMVWvYw[/video]
Recommended System Requirements:
CPU Quad- Core, Dual-core 1.2Ghz+, equivalent or better.
GPU Adreno 220+, Nvidia Tegra2/3/4, equivalent or better.
Memory 1GB-2GB, Min=512MB. My Config asks for a min of 256MB & shouldn't be run on a device with less than 512MB.
8GB disk space
Minimum System Requirements:
1Ghz Single-Core CPU with 512MB of Ram
4GB Disk Space
Full Fallout 1 install instructions:
1)You will need to have the DosBox Turbo app installed on your Android device. Run the DosBox Turbo app and open the settings menu from either the pull down menu at the Top or left side swiping menu. Go to "DosBox Settings/Advanced DosBox Config" check "Manual Mode". You must restart the app before these changes will take effect.
2)Download and install Fallout 1 the game on your PC. I got it from a free promotion @ GOG
Fallout 1 directory Locations:
By default the GOG version of the game should be located at C:\GOG Games\Fallout
By default the CD or DVD version of the game should be located at C:\Program Files\BlackIsle\Fallout
3)Download and extract the Fallout 1 Dos files below. You will need to add these Dos files into the fallout 1 folder installed on your PC. Copy and paste them directly into that folder.
fallout1.1+Dos Patch download:
4)Download and extract the Fallout 1 configs files .zip below. Locate the fallout 1 config folder inside. Here you will find two different Fallout 1 configs to choose from. If you have a fast device place the config file from the "Config With Video & Ambient sounds" into your Fallout 1 install folder. If you have a slower device, or experience performance issues, then place the config file from the "Config without Video & Ambient sounds" into your Fallout 1 install folder. Once you have all the necessary files in the Fallout 1 folder copy and paste the entire folder into the Root directory or your Android device, this is the default location that opens when you plug in the USB cable and explore the device.
Download Fallout 1 & DosBox Turbo Config files. Notes:For all devices, 256MB mem, cycles set to default Max, Auto.exe:
Config V4.0 For all devices, 256MB mem, cycles set to default Max, Auto.exe :
Optional) Install the NPC patch: This allows you to edit your NPC follows weapons and inventory, like in Fallout 2. Download, extract and place the "Data" folder into your fallout 1 directory.
NPC mod Download:
5)Look Inside the Fallout 1 configs folder. The second folder called "DosBox Config" has a modified Dosbox Turbo Auto exe Config File. You will need to copy and paste it into the root directory of your Android device along with the Fallout 1 folder. Make sure you have done step 1 or this will not work and you will have to recopy the file after redoing step 1. The Root directory is in the internal memory, the default location that opens when you plug in the USB cable and explore the device. Now you are ready to launch the DosBox Turbo app from you Android device and begin your adventure into the Wasteland.
6)(Optional)Get the free Hackers Keyboard from the Play Store. It has a better layout for playing games and includes directional keys.
Using Virtual On Screen Buttons:
-In the DosBox settings menu check “Overlay Buttons”.
-Open “Button/Controller Maps” and choose “Add button Mapping”.
-A new label will appear, click it “Map custom Button (x)”
-At the top select 1 of 4 custom buttons to map
-Now select “Dos key mapping” and assign a key to the button.
-Once done select ok and repeat this for all 4 buttons.
-A good setup for playing fallout would be:
-Btn A=space, Btn B=b, Btn C=I, Btn D=s
-space=end turn, b=change hands, i=inventory, s=skill index,
-There is a Fast Forward button at the very bottom of the “Dos key mapping” menu, scroll down all the way.
-Map this key and you can hold it down to increase the cycles.
-This helps to speed up long load times, but note it will distort any audio that is playing.
Fallout 1&2 QEMU Android installation guide(Free App):

QEMU Version:
[video=youtube_share;hYTTrHbQcBo]http://youtu.be/hYTTrHbQcBo[/video]
Fallout 1&2 are now Fully playable on Android with all the sounds and music from the original game.
With the use of an Android X86 emulator QEMU, you will learn how to install and play your own copy of Fallout1or2 on Android.
Games are Not included! (Some Assembly Required)
Recommended System Requirements:
CPU Quad- Core, Dual-core 1.2Ghz+, equivalent or better.
GPU Adreno 220+, Nvidia Tegra2/3/4, equivalent or better.
2GB, 1GB, 512MB. My Config asks for a min or 256MB & shouldn't be run on a device with less than 512MB.
8GB disk space
Minimum System Requirements:
1Ghz Single-Core CPU with 512MB of Ram
GPU Adreno 220
4GB Disk Space
Note:If you only meet the minimum requirements, then see Step 6 and use the optional Fallout2 Config without Video & Ambient sounds.
Tested Devices: Note2, HP TouchPad, Galaxy s3, Galaxy s1 i9000
How to install Fallout on your Android device:
1)You will need Fallout 1or2 the game fully installed on a PC (Not provided here)
Download QEMU Emulator for Android:
2)a]Version 1.0 for Playing Fallout 2 Regular QEMU Download:
Or
2)b)Version 2.0 for Playing the Fallout 2 Restoration Project QEMU Download:
Note: Version 1.0 is more stable but will not work properly with the Restoration Project.
3)Getting Fallout 1 & 2 setup to Play on Android:
Fallout 2
-If you wish to play Fallout 2 I recommend installing Killap’s unofficial fallout 2 patch.
1) Download and Extract the Unofficial patch, open the folder.
2) Open the "main" folder and copy and paste these files into your Fallout 2 install directory. (yes to overwrite the files)
3) Open the "Windows 95-98-ME" folder and copy and paste these files into your Fallout 2 install directory. (yes to overwrite the files)
4) Open the “Batch_work’ folder and copy and paste these files into your Fallout 2 install directory. Run the "master_dat_fix_up.exe" file (A window will popup)
5) Next this is EXTREMELY important, in your Fallout 2 install directory delete a file called "patch000.dat"
6) Download and install one of my custom Fallout cfg files by copying and pasting it into your Fallout directory. These config files correct the game path for the sound data files.
a)Config With Video & Ambient sounds: This can improve screen scroll performance with and increased art_cache_size=256. You can also manually open the fallout2.cfg and change the value. I recommend 256, 512, or 768 (default=8).
b)Config without Video & Ambient sounds: This increases performance by removing ambient and video sounds. If you experience crashing when the videos play then, you will need this file. Note*NPC conversations will still have spoken dialogue.
Note: Fallout 2 should be played at the default resolution of 640x480, with a 8bit color depth in basic graphics mode for best results. Using higher resolutions with 16-32bit colors or using DirectX9/Direct draw 7 graphics modes can cause the game to become unplayable.
7) (Optional) You can also install Mash’s resolution patch: to increase your screen size.
Note This may impact game performance but allows you to see much more of the map at once.
Download Fallout2 Hi-Res Patch v3.06
Fallout 2 Restoration Project
Note(Important) The Fallout 2 Restoration Project requires a faster device to run than a regular install of Fallout2. A fast Dual or Quad core device with 2GB+ is Recommended
-If you wish to play Killaps Fallout 2 Restoration Project on Android then you must do the following.
1) Download and Extract the manual Restoration patch, open the folder.
2) Open the "main" folder and copy and paste these files into your Fallout 2 install directory. (yes to overwrite the files)
3) Open the "Windows 95-98-ME" folder and copy and paste these files into your Fallout 2 install directory. (yes to overwrite the files)
4) Open the “Batch_work’ folder and copy and paste these files into your Fallout 2 install directory. Run the "f2.bat" file (A window will popup)
5) Next this is EXTREMELY important, in your Fallout 2 install directory delete a file called "patch000.dat"
Fallout 2 Restoration Project Manual Version Download:
6) Download and install one of my custom Fallout cfg files by copying and pasting it into your Fallout directory. These config files correct the game path for the sound data files.
a)Config With Video & Ambient sounds: This can improve screen scroll performance with and increased art_cache_size=256. You can also manually open the fallout2.cfg and change the value. I recommend 256, 512, or 768 (default=8).
b)Config without Video & Ambient sounds: This increases performance by removing ambient and video sounds. If you experience crashing when the videos play then, you will need this file. Note*NPC conversations will still have spoken dialogue.
7) Download the citylimit49_mapper here and place it into your Fallout 2 follder. Run the exe to extract the files. (yes to overwrite the files)
-Look in the Fallout 2 folder for the F49+.exe file that was extracted and run it. It will fail to patch the mapper but will patch the Fallout.exe and allow us to play the restoration project. All done have fun.
Fallout 1
-If you wish to play Fallout 1 I recommend installing the Dos Patch and launching the game from the Dos exe file.
1)Download and install Fallout 1 the game on your PC. I got it from a free promotion @ GOG
2)Download and extract the Fallout 1 Dos files below. You will need to add these Dos files into the fallout 1 folder installed on your PC. Copy and paste them directly into that folder.
fallout1.1+Dos Patch download:
3) Download and install one of my custom Fallout 1 cfg files by copying and pasting it into your Fallout 1 directory. These config files correct the game path for the sound data files.
-There are two different config files. The one without video & ambient noise is for slower devices that just meet the Min system requirements or have performance issues.
4)Optional) I also installed this NPC patch from the no mutants allowed website. This allows you to edit your follows weapons and inventory, like Fallout 2. Download and extract these files into the Data folder in your fallout 1 directory.
NPC mod Download:
4) Download and Extract either the 2GB or 1GB empty HDD.img files to an easy to find location on your PC. Bigger is Better, for improved stability! Default is 2GB.
5) Install the free 30 day trial of WinImage and run the application. Be sure to use it before 30 days passes.
WinImage 9.00 Download:
6) Open the empty HDD.img by dragging it into the open Winimage program. Or navigating to it from file/open
7) Locate your fully installed Fallout 1 or 2 game folder. Transfer the Fallout game folder into the HDD.img and save it. This should include Killaps Patches and Mash’s resolution patch. I would recommend playing at 640x480 if you have a dual core device. You can attempt 800x600 or 1024x768 if you have a quad core device. Single core devices should use my No Video or Ambient noise Fallout cfg.
(Optional) You can install one of my custom Fallout cfg files by copying and pasting it into the Fallout directory.
a)Config With Video & Ambient sounds: This is recommend to improve screen scroll performance and sound compatibility.
b)Config without Video & Ambient sounds: This has the same sound tweaks but further increases performance by removing ambient and video noises. Note*NPC conversations will still have spoken dialogue.
7) Save your new HDD.img and close the program.
8)Copy and paste your new Fallout2 HDD.img into the SDL folder in your downloads.
9)Transfer the sdl folder to your devices internal memory. This will be the location that opens when you plug in the USB cable.
10)Transfer the libSDL.apk to your device and install it. Note* you may need to Enable 'Unknown Sources' from Settings/Security/Enable.
11)Run the libSDL.apk and start windows. Skip scan disk if it comes up.
12)Play Fallout2 on Android and wander the wasteland.
(Optional) Interface Apps:
(Optional) GameKeyboard app that lets you make onscreen buttons and choose the keys:
(Optional)Get the free Hackers Keyboard from the Play Store. It has a better layout for playing games and includes directional keys.
Notes(Important)
SDL cfg File:
-Located in the sdl folder you will find the sdl.cfg file. This allows you to edit the instructions given to the emulator.
-You can edit and save changes to this file using notepad.
-Here is the default line for the sdl.cfg file.
/sdl -L . -m 256 -boot c -hda c.img -hdb HDD_2Gb.img -usb -usbdevice tablet -soundhw sb16
-You can increase or decrease the Memory –m 128 or 256 or 512+(recommended)
-The Default is 256MB for compatibility.
-Set the emulated Memory size to half of your total system Memory size. So if your device has 1GB of DDR use the 512 setting.
-You can change the name of the HDD –hdb HDD_2Gb.img Note*It Must match the exact name in your sdl.cfg file.
-Add additional HDD’s by adding sequentially lettered –hd(x) Like so
- /sdl -L . -m 256 -boot c –hda c.img –hdb hdd_2Gb.img –hdc hdd_2Gb.img –hde hdd_2Gb.img… ect
-The default is HDD_2Gb.img but you can edit the file with notepad. Just change the 2 to a 1, to use the HDD_1Gb.img, save and exit.
Extra HDD for Virtual Memory:
-I would highly recommended attaching a 1/2GB HDD used only for virtual memory. You can use the Virtual Memory sdl cfg line below.
-Once you are running the emulator right click on the vault 13 desktop icon and choose properties, select the performance tab. -Next select “virtual memory” at the bottom, click “Let me specify my own virtual memory settings” and select the HDD you attached.
-It will prompt you to reboot once you exit. Don’t reboot, choose no, and then shutdown and re-launch the emulator.
-This will help to keep System Resources between 98-99% free. This helps to optimize the performance and improve stability.
-You can check the performance by right clicking on the desktop vault computer and selecting properties. Navigate to the performance tab at the top and look for “System Resources:98%free”.
Virtual Memory sdl cfg:
/sdl -L . -m 512 -boot c -hda c.img -hdb HDD_2Gb.img -hdc HDD_1Gb.img -usb -usbdevice tablet -soundhw sb16
Overclocking:
-You will need to be rooted in order to Overclock your device. Increasing your CPU speed can have a large impact on performance and could make games playable on older devices.
-Get a free overclocking app from the Play Store such as AnTuTu's CPU Master (free). Open the app and increase the speed in small increments of 100-200Mhz and then run AnTuTu's Benchmark to check stability and performance. Once you've found a stable overclock start up QEMU and have fun.
Troubleshooting:
-You must click the volume bottom before you can move the mouse.
-To help maintain stability try and minimize back ground app activity while running Fallout.
Note*Fallout1&2 runs reasonably stable. Reasonably stable = testers report gaming session of 1-3hrs.
Tweaking the CPU Settings:
Increasing the minimum CPU frequency may help to improve stability. You can use the free CPU Master App. Also set the CPU governor to Performance or on demand. Don’t forget to set it back to normal after your finished exploring the wasteland.
CPU Master Play Store (free app):
Links:
How to Play Baldur’s gate on Android [XDA Thread]
How to Play Baldur’s gate on Android [Video]
GameBurnWorld No-CD Game Fixes
Fallout 1 Patches @ No Mutants Allowed:
Fallout 2 Patches @ No Mutants Allowed:
Fallout 2 Restoration Project Main Page:
Last edited: